P3. Projects editor modes
Project editor has three modes: Edit, Run and Debug. The mode selection buttons (i.e. the Mode switcher) are located in the toolbar of the Project editor and will only be displayed if EEZ Flow is used in the project.
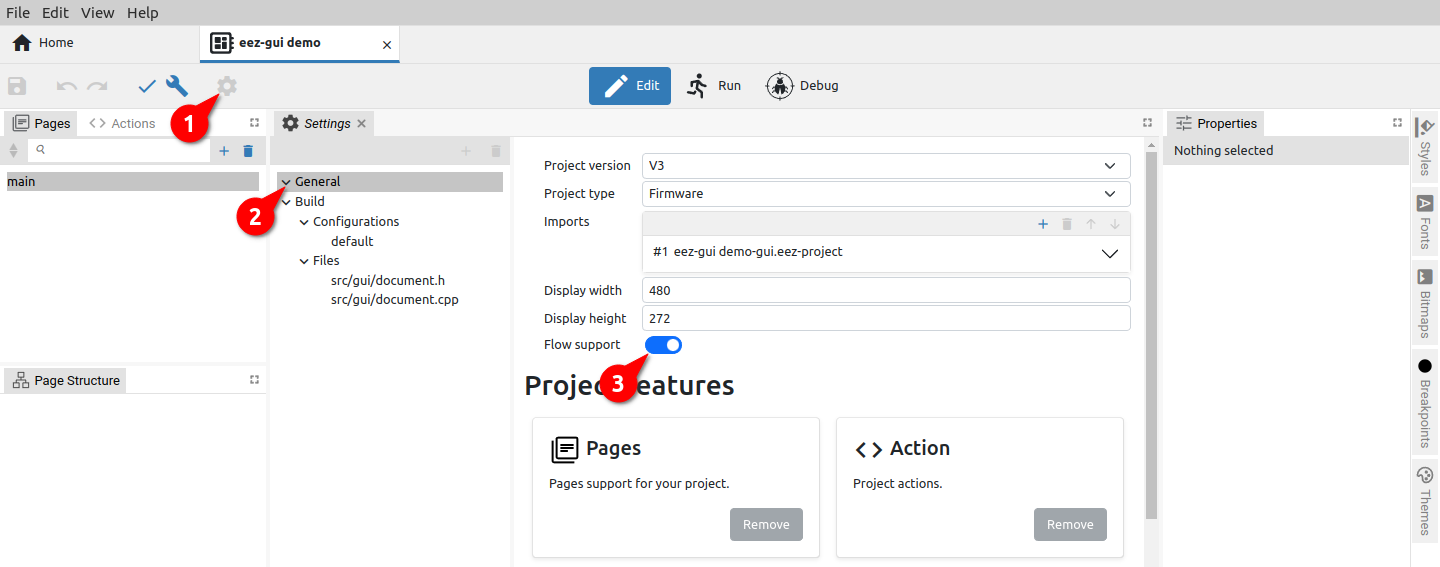
While the Dashboard project type includes EEZ Flow by default, for EEZ-GUI and LVGL projects it will be necessary to explicitly set whether or not to use EEZ Flow. To add EEZ Flow to such projects, use the Flow support option (Fig. 1).
P3.1. Toolbar overview
The appearance of the Toolbar depends on the Project editor mode. Certain options are common to all modes, while some depend not only on the current mode but also on the selected Project features in Settings or the use of global variables when their status will be displayed.
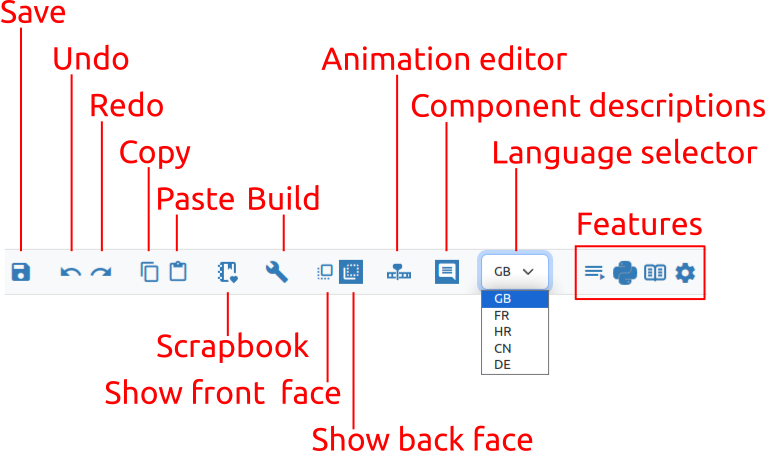
Fig. 2 shows the toolbar with all options displayed. Their availability in each mode is shown in Table 1.
What editors are in Edit mode, viewers are in Run and Debug mode. So we have Page viewer (in Run and Debug mode) and Action viewer (Debug mode only). For example, page viewer displays the page in the same way as the editor, but editing is not possible.
When the Project editor is in Run mode, it displays only the toolbar and the active page viewer.
In Run and Debug mode, it is not possible to change the project, but only to monitor the execution of the project.
Statuses of global variables are present only in Run or Debug mode and if the project has at least one global variable of type object, e.g. Instrument connection or PostgreSQL connection. Status shows icon, connection state (connected / disconnected) and title. By clicking on the status of the global variable, you can e.g. change the connected instrument or PostgreSQL connection parameters.
|
Function / Group |
Edit |
Run |
Debug |
|
Save |
√ |
|
|
|
Undo |
√ |
|
|
|
Redo |
√ |
|
|
|
Copy |
√ |
|
|
|
Paste |
√ |
|
|
|
Scrapbook |
√ |
|
|
|
Check |
√ |
|
|
|
Build |
√ |
|
|
|
Run MicroPython Script (EEZ BB3 only) |
√ |
|
|
|
Show front face |
√ |
|
√ |
|
Show back face |
√ |
|
√ |
|
Show / Hide animation timeline editor |
√ |
|
|
|
Show / Hide component descriptions |
√ |
|
√ |
|
Language selector |
√ |
|
|
|
Features |
√ |
|
|
|
Mode switcher |
√ |
√ |
√ |
|
Global variables status |
|
√ |
√ |
Table 1: Toolbar options in all modes
P3.2. Toolbar in Edit mode
Undo / Redo
Undo / Redo recent editor Action. If any changes have been made to the project since the last save, a * sign will appear in the project tab next to the name (Fig. 4).
Copy / Paste
The editor allows you to copy one or more project items using the Copy (1) and Paste (2) options shown in Fig. 5.
In the example in Fig. 6, the Main page is selected, which will be named Main_1 when copied (3).
In the event that the content of one project is copied to another project, a note will appear as shown in Fig. 7.
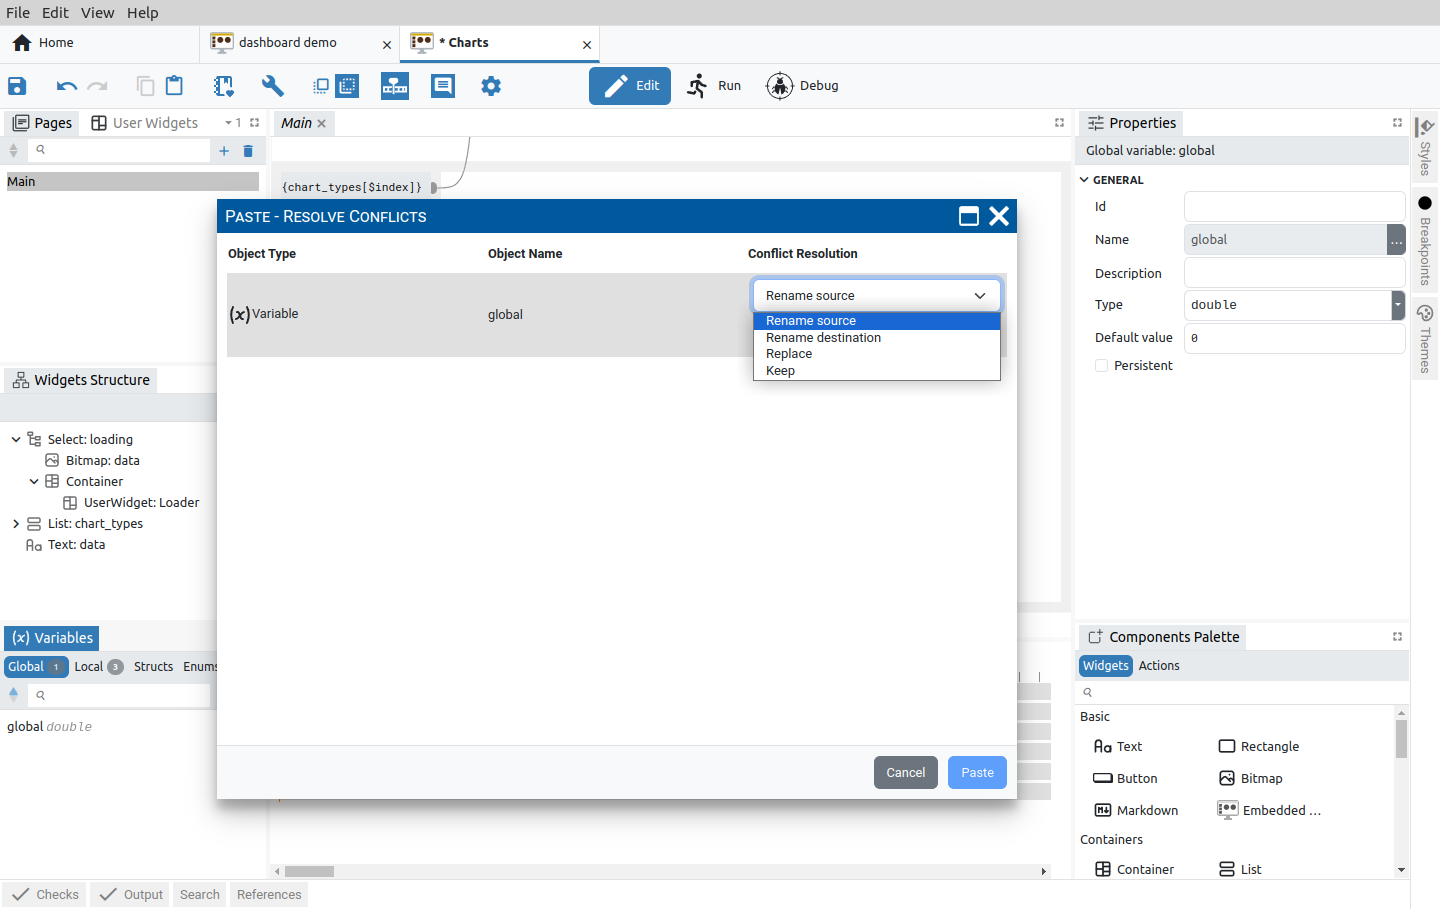
In case we want to paste with all dependencies and there are one or more items with the same name in the destination project, a dialog box will appear to resolve the conflict. In our example, if we want to copy a variable named global of type integer, since there is a variable of the same name but of a different type (double) in the destination project, a conflict resolver will appear as in Fig. 8.
The following four options are offered to resolve the conflict:
|
Option |
Description |
|
Rename source |
Use if you want to paste the item with a new name. |
|
Rename destination |
If we want the pasted item to keep its original name, use this option to change the existing item name in the destination project. |
|
Replace |
By selecting this option, the existing item in the destination project will be overwritten with the copied item. |
|
Keep |
In case you don’t want to overwrite an existing item in the destination project with a new one, use this option. |
If the question from Fig. 7 if we answer negatively, and there is an item with the same name in the destination project, a new item with a suffix in the name will be created when copying, which in our example will be global_1.(Fig. 9).
Scrapbook
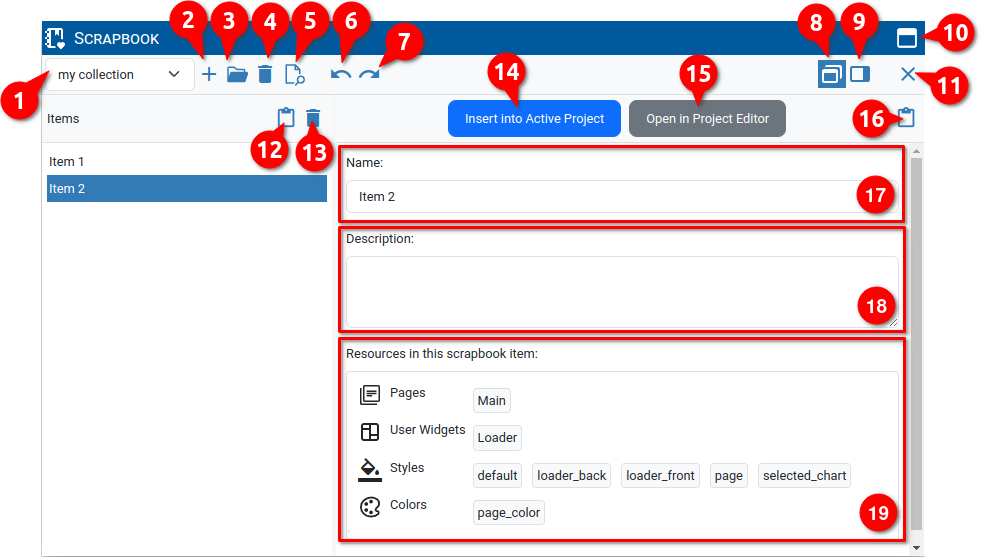
Copying items between projects allows them to be saved in the Scrapbook, where they will be saved until they are explicitly deleted, unlike the clipboard, where they will be saved only until the first restart of EEZ Studio. An additional advantage of Scrapbook over the clipboard is that it can have multiple "instances" and can contain a wide variety of content. Each Scrapbook is a separate file (SQLite) on disk that can be freely copied, archived, etc.
It is possible to add any item of an existing project to the Scrapbook and it can contain an unlimited collection of items that can be copied to other projects and edited if necessary.
|
# |
Option |
Description |
|
1 |
List of scrapbook files |
List of Default scrapbook and all user created scrapbook files. |
|
2 |
Create a new Scrapbook file |
Creating a new user scrapbook file. |
|
3 |
Open a Scrapbook file |
Opening an existing scrapbook file from disk (the file extension is .eez-scrapbook). A successfully loaded scrapbook will be added to the scrapbook list (1). |
|
4 |
Delete Scrapbook file |
Removing a scrapbook file from the list of scrapbooks (the file will not be deleted from disk). |
|
5 |
Show Scrapbook file in File explorer |
Open the folder on the disk that contains the scrapbook files. |
|
6 |
Undo |
Undo operation in scrapbook. |
|
7 |
Redo |
Redo operation in scrapbook. |
|
8 |
Undock into separate window |
Display scrapbook in free floating window (default view). |
|
9 |
Dock to the side |
Docking of the scrapbook display within the project editor. |
|
10 |
Maximize |
Maximizing the scrapbook view. |
|
11 |
Close |
Close the scrapbook view. |
|
12 |
Create a new Scrapbook item from the Clipboard |
Copying the contents of the system Clipboard into a newly created item that will be displayed in the list of items and whose name (17) and description (18) can be edited as desired. |
|
13 |
Delete this item |
Deleting the selected item from the list of items. |
|
14 |
Insert into Active Project |
Paste the content of the item into the selected project. In case there is a conflict, the conflict resolver will open (similar to Fig. 8). |
|
15 |
Open in Project Editor |
Since the scrapbook file is a valid EEZ Studio project, it can be opened for viewing and editing using this option. |
|
16 |
Paste Clipboard content into selected Scrapbook item |
Adding the contents of the system Clipboard to an existing item. For example, item already has the variable global:
If there is global_1 in the Clipboard, using this option, that variable will appear in the same section (Variables).
|
|
17 |
Name |
The name of the scrapbook item. |
|
18 |
Description |
Description of the scrapbook item. |
|
19 |
Resources in this Scrapbook item |
List of all resources that the selected item contains. |
Check
All project elements are checked without building the executable code. The Results are displayed in the Output panel (Fig. 11).
Build
Build the executable code after checking all the elements of the project. The results are displayed in the Output panel (Fig. 12).
Run MicroPython Script (EEZ BB3 only)
The option is available for a MicroPython Script type project that can be executed on an EEZ BB3 device. The MicroPython feature should also be selected in the project’s general settings.
It starts the build of the project when the accompanying resource file (.res extension) is generated, which will be transferred together with the MicroPython script (.py extension) to the selected EEZ BB3 where it will be started.
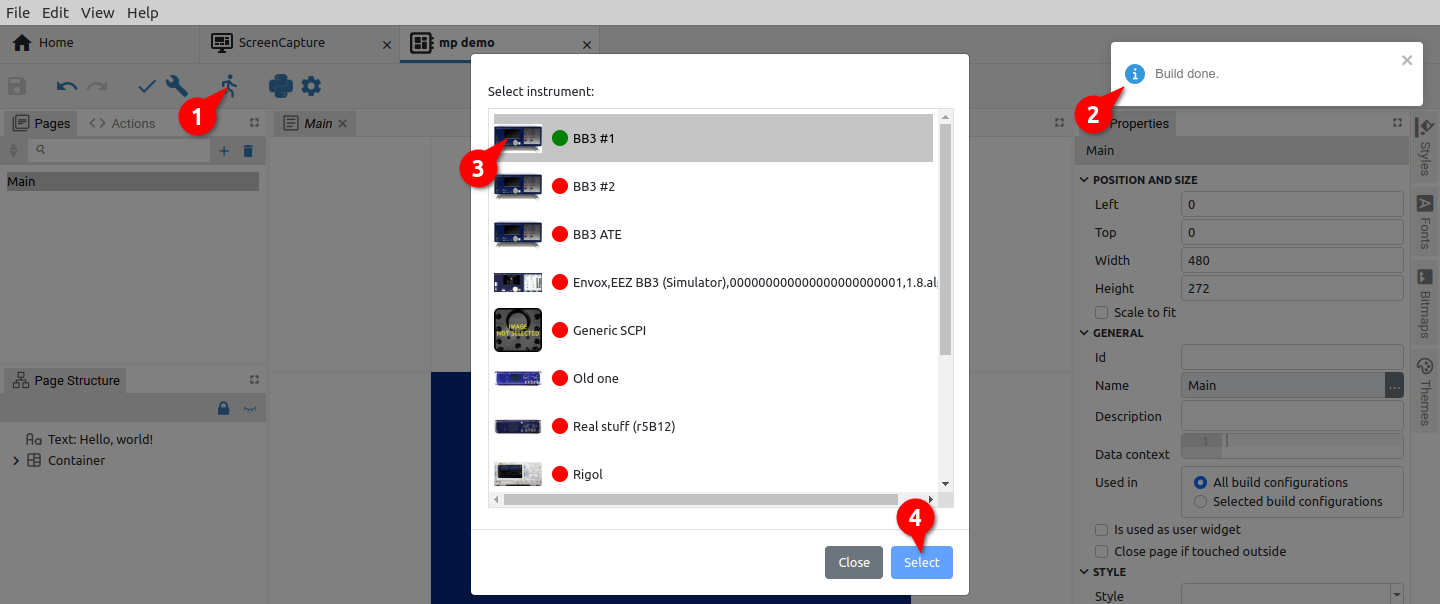
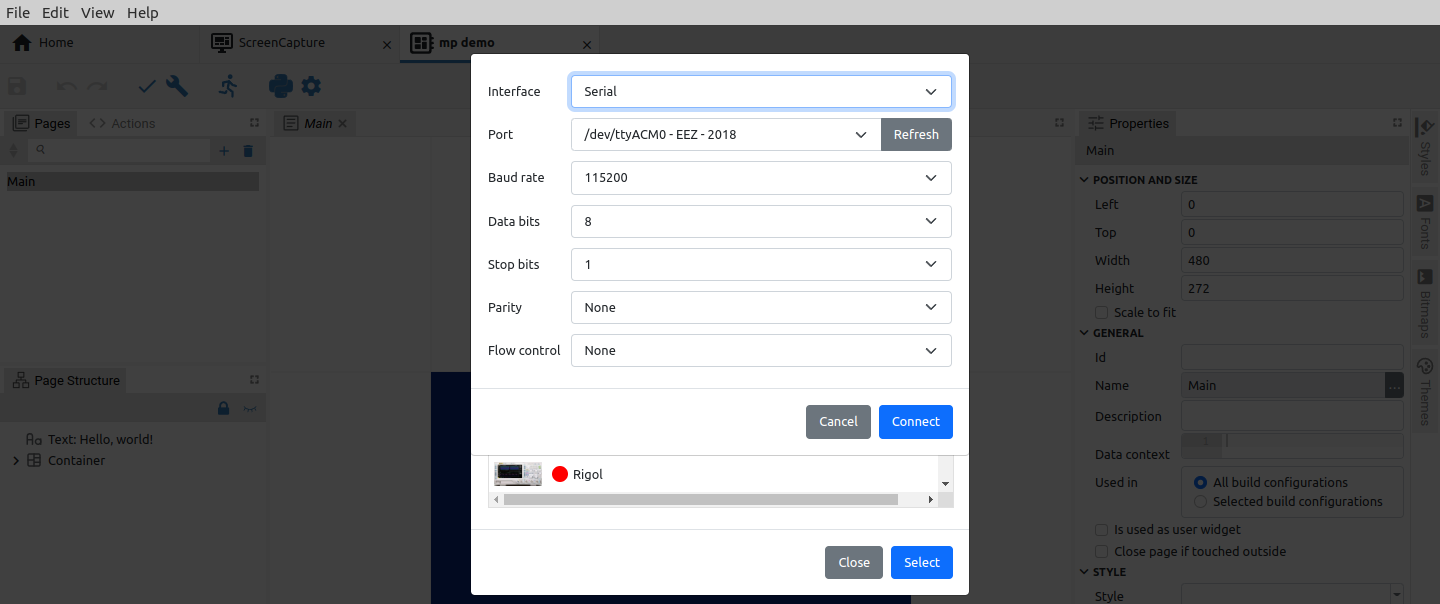
In case there is no active connection with the selected EEZ BB3, an additional dialog box for establishing the connection will appear. For example in Fig. 14 the serial interface is selected.
Finally, after the project files (.py and .res) have been successfully transferred to the selected EEZ BB3, an indication will appear when the MicroPython script has been started (Fig. 15).
Show front face
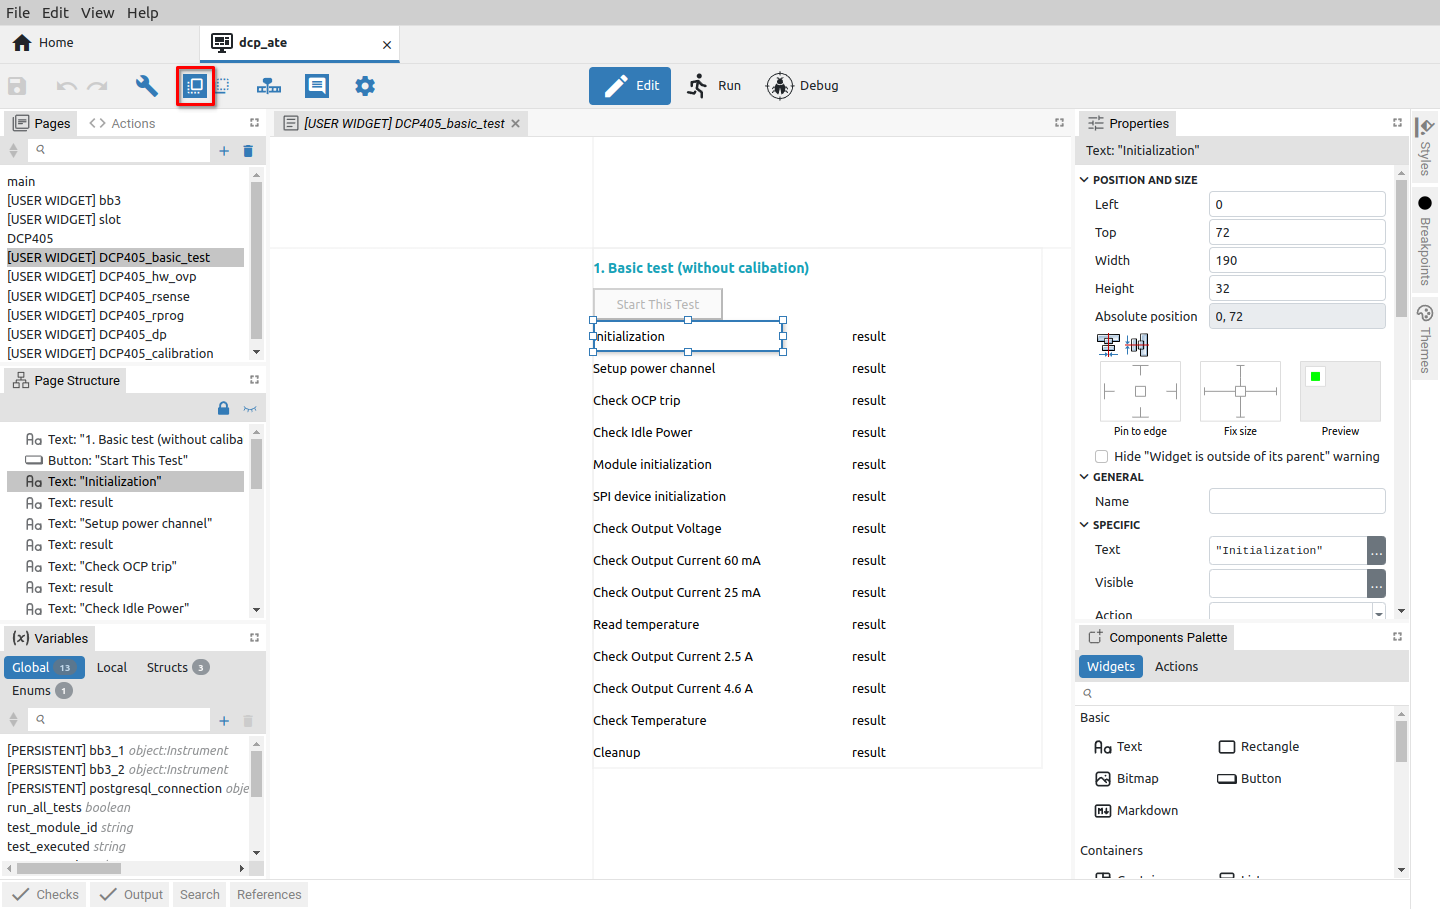
Shows only Widgets without Action components and lines in the page editor for better readability. This button is present if EEZ Flow is enabled in the project and if the page editor is in focus (Fig. 16).
Show back face
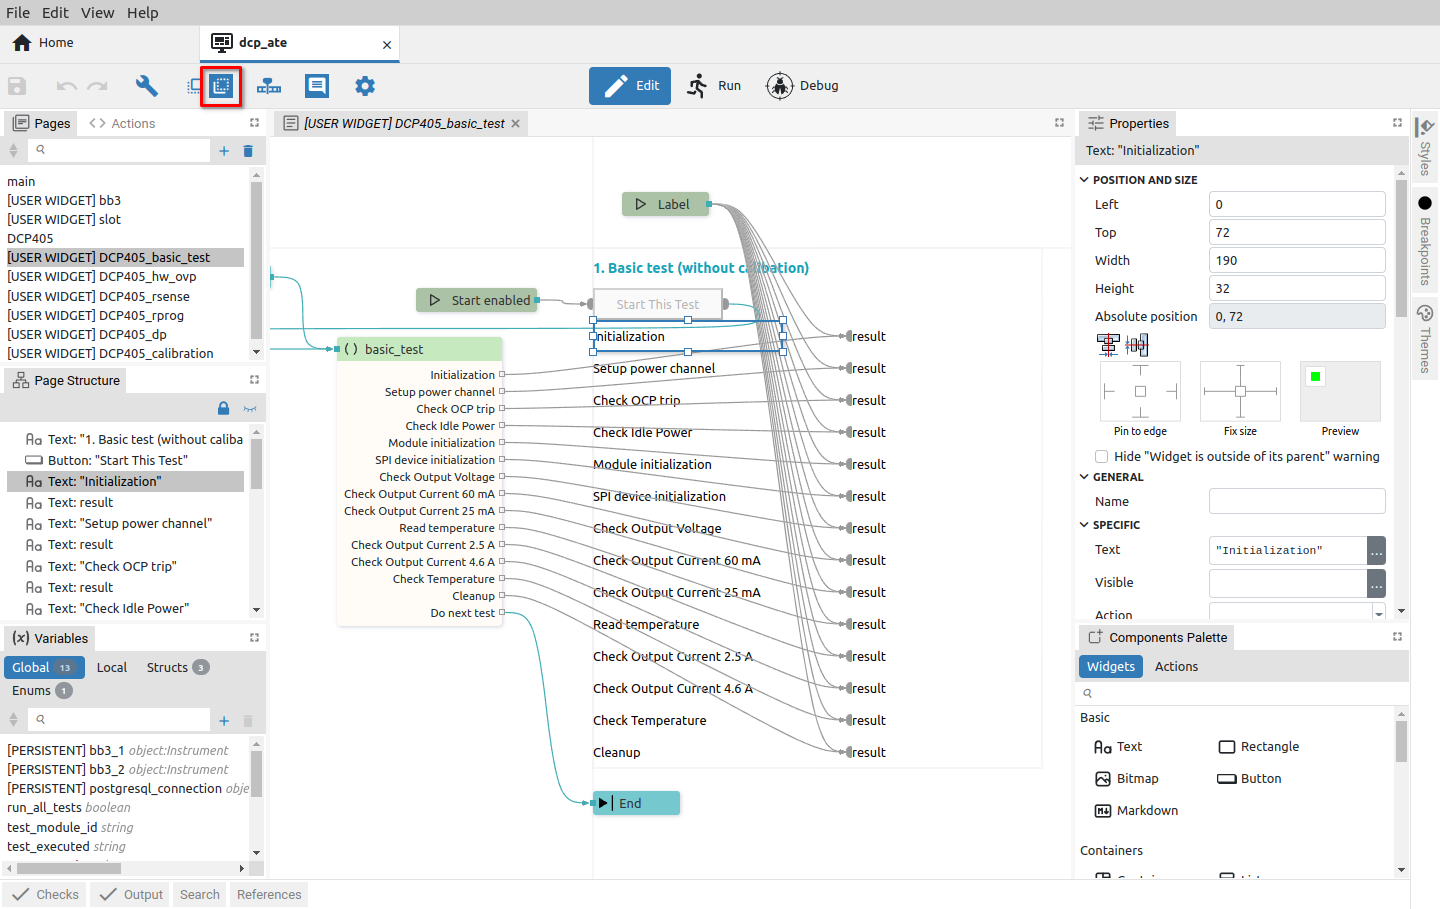
Shows all components (both Widgets and Actions) and lines in the page editor. This button is present if Flow is enabled in the project and if the page editor is in focus (Fig.17).
Show / Hide animation timeline editor
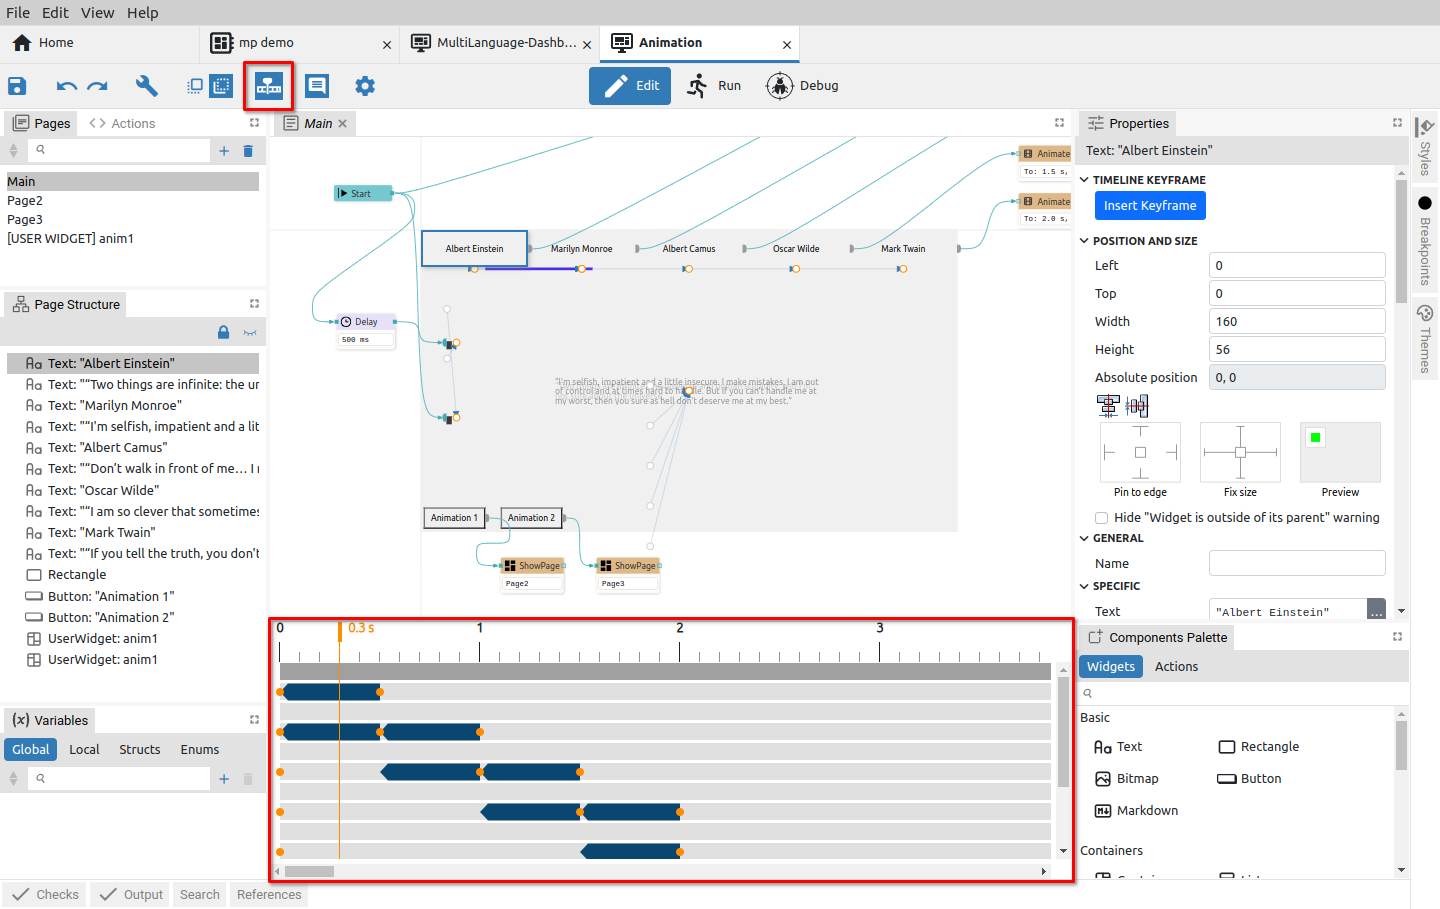
EEZ Flow supports animation of page content, for which the Animation timeline editor is used.
An icon in the toolbar to show and hide it will appear when the page editor is in focus. EEZ Flow should also be enabled in the general settings of the project (Fig. 1).
The animation timeline editor is displayed in the space below the page editor (Fig. 18).
Show / Hide component descriptions
Each component has a Description property. With this option, we choose whether the description will be seen under the component or not (Fig. 19).
The option is only displayed if the page editor is in focus and Show back face is selected.
Language selector
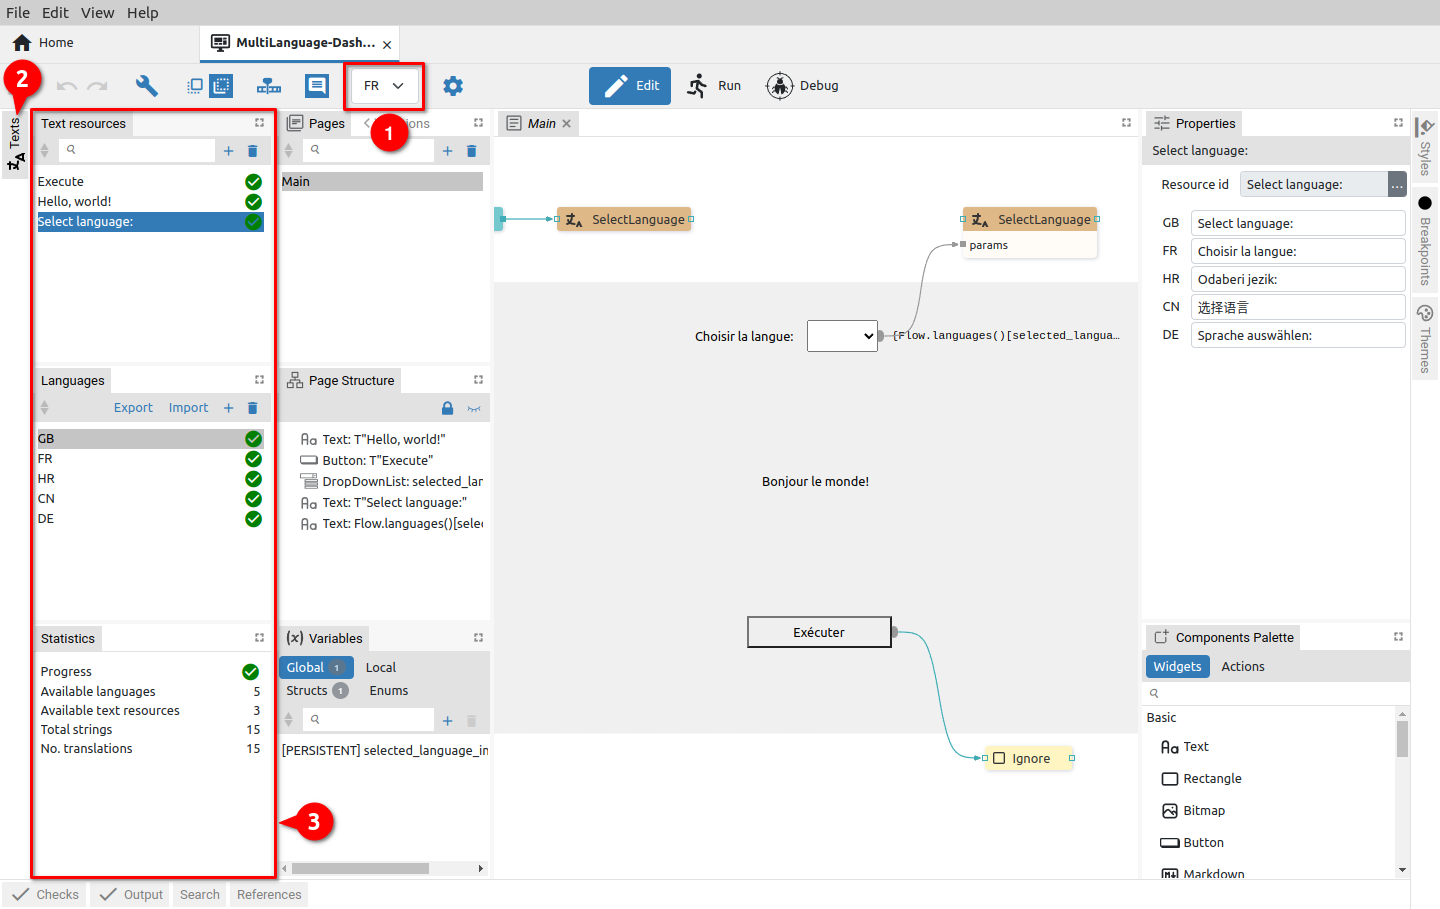
This option is present in the toolbar if the Texts feature is selected in the project general settings and if at least one language is defined. Then the Texts tab will appear in the left border tabset (2), whose panel (3) contains definitions of multilingual text strings, used languages and translation statistics.
The texts displayed in the page editor will be displayed in the language selected in the language selector of the toolbar (1). In the example in Fig. 20 French (FR) is selected.
P3.3. Feature buttons
The following project features when selected in the project general settings will add an icon to the toolbar: Shortcuts, MicroPython and Readme. Project Settings also has its icon in the toolbar. The mentioned features, when selected, are displayed in the project editor as described in Chapter XX.

